
Infrastructure preparation
Before you start using OpenShift Virtualization Engine, you will have to make sure that you have your Red Hat cluster ready.
Cluster and platform requirements
You will need the following:
- A Red Hat OpenShift cluster (version 4.10 or later) with administrator access
- Access to the OpenShift Web Console and a configured oc CLI
- Deployment on a supported platform (bare metal, VMware vSphere, AWS, etc.)
- Sufficient cluster capacity to support virtualization workloads
OpenShift Virtualization Engine builds on the standard OpenShift architecture. It enables virtual machines and containers to run on the same platform without introducing a separate management layer. The control plane manages cluster state and scheduling, while worker nodes execute both containerized and virtual machine workloads.
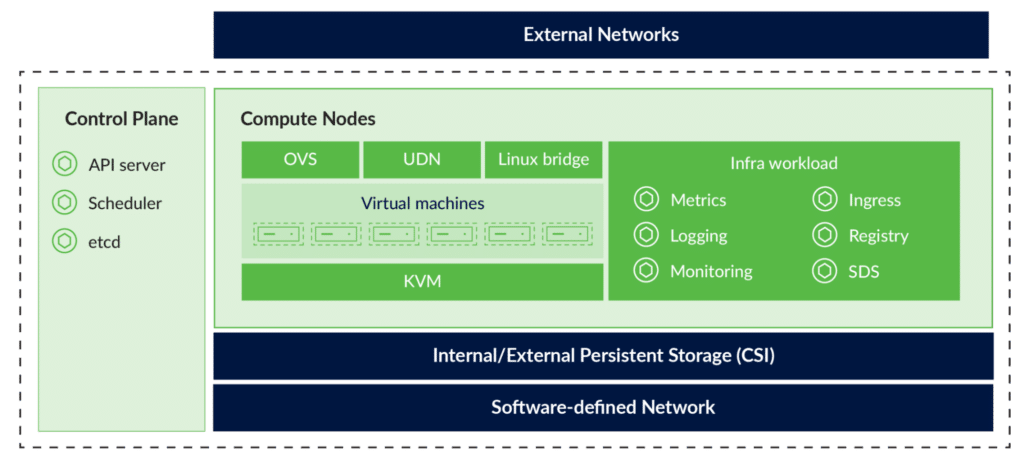
The OpenShift cluster architecture from the official Red Hat documentation (source)
Validate hardware virtualization on worker hosts
On each worker node, confirm that the CPU exposes virtualization extensions (vmx for Intel or svm for AMD) and that KVM kernel modules are loaded. Missing flags usually indicate that virtualization is disabled at the BIOS or hypervisor level. Without these capabilities, virtual machines will fail to start.
Common VM startup failures
Issue | Likely Cause | Recommended Action |
DataVolumeError / import failed | Invalid source URL, registry access issues, or CDI failure | Run oc describe dv … and correct the source URL, credentials, or registry access |
PVC Pending / not Bound | StorageClass mismatch, provisioning issue, or insufficient capacity | Run oc describe pvc … and adjust StorageClass configuration or parameters |
virt-launcher CrashLoopBackOff | Guest OS or hypervisor process failure | Check logs using oc logs –previous … and inspect pod details with oc describe pod … |
Unschedulable / ImagePullBackOff | Insufficient node resources or incorrect image configuration | Adjust resource requests/limits or fix image reference and pull configuration |
For rollback and disaster recovery, OpenShift Virtualization supports VM snapshots and also documents VM backup/restore using OADP (Velero-based) with specific supported modes. For robust enterprise-grade backup and DR, organizations typically choose certified ecosystem solutions like Trilio, which provides policy-driven orchestration, application-consistent recovery, and automated multi-cluster replication.
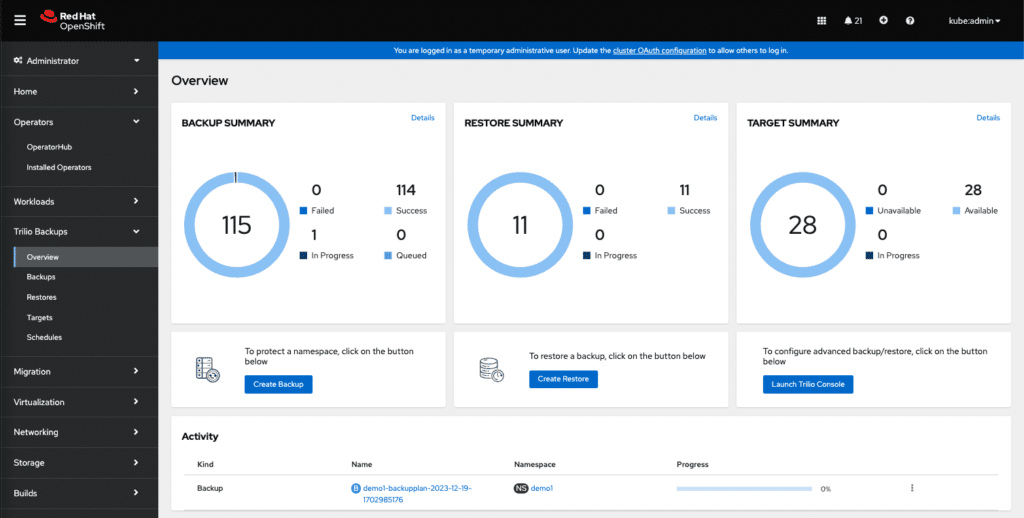
Trilio’s Integrated Data Protection for OpenShift (source)
