OpenStack is one of the most widely deployed open-source cloud platforms. It is available in a community edition (vanilla version) maintained by the OpenStack Foundation and is also packaged and distributed by different vendors and communities, each covering specific use cases and deployment needs. For Canonical, the foundation for their enterprise distribution is the Sunbeam OpenStack project, which is what provides the core framework for simplified deployment and lifecycle management. It is important to note that Sunbeam OpenStack serves as the foundational upstream project, while Charmed OpenStack is the focused, commercial product that the reader will be implementing.
In the following article, we will cover the deployment process of the Charmed OpenStack distribution packaged by Canonical, the company behind Ubuntu. The deployment is tightly integrated with Ubuntu OS and is orchestrated via Canonical’s Juju and Metal as a Service (MAAS) tools. These tools provide an enterprise-grade cloud deployment, and Canonical offers optional commercial support for the critical workload infrastructure.
Summary of key Charmed OpenStack concepts
Concept | Description |
Containerized services | Most OpenStack control plane services (e.g., Keystone, Nova API, Horizon) run in LXD containers for isolation and resource efficiency. |
Infrastructure management | MAAS provisions and manages physical nodes and LXD containers for Charmed OpenStack deployment. |
Service orchestration | Juju orchestration automates the deployment, configuration, and scaling of OpenStack services. |
Deployment model scripts | Juju charms encapsulate the logic for deploying and managing OpenStack services. |
Automated Application-Centric Red Hat OpenShift Data Protection & Intelligent Recovery
Intro to Canonical OpenStack via Juju charms
Charmed OpenStack is a powerful, automated solution for deploying and managing an OpenStack cloud. Through the use of Canonical’s orchestration tools (Juju and MAAS), Charmed OpenStack simplifies the complex process of setting up and operating a scalable, production-grade cloud infrastructure. The service orchestration deploys most of the control plane services in LXD containers, which offer resource efficiency, service isolation, and easier upgrades. Specific services, such as compute hypervisors and storage daemons, are run directly on cloud nodes.
Metal as a Service (MAAS)
MAAS is an open-source tool developed by Canonical for the deployment and provisioning of bare metal servers. The idea is to treat your physical hardware as a cloud virtual machine. MAAS provides multiple network services—including PXE boot, NTP, DHCP, DNS, and proxy services—for booting up and installing an OS over the network, and it also performs network and storage configuration using cloud-init. MAAS can install multiple OS, including Ubuntu, CentOS, RHEL, and Windows.
What are JuJu and charms?
Juju is an open-source orchestration tool developed by Canonical. It can perform the deployment, integration, and lifecycle management of applications across multiple cloud environments. Juju uses model scripts called “charms” that define how to install, configure, and integrate applications. Juju allows you to declaratively define relationships between services (e.g., connecting a web application to a database).
Why deploy OpenStack via Juju?
OpenStack comprises many components, including compute, storage, networking services, and backend services such as databases and message queues. The manual installation and configuration of each service is a complex and time-intensive process. Juju charms provide best practices for automating the installation and configuration of OpenStack components that reduce errors and setup time. Juju is also able to handle service interconnectivity, like integrating Keystone to MySQL or connecting Nova with Neutron. Juju also provides tools to perform upgrades of the OpenStack releases using simple commands.
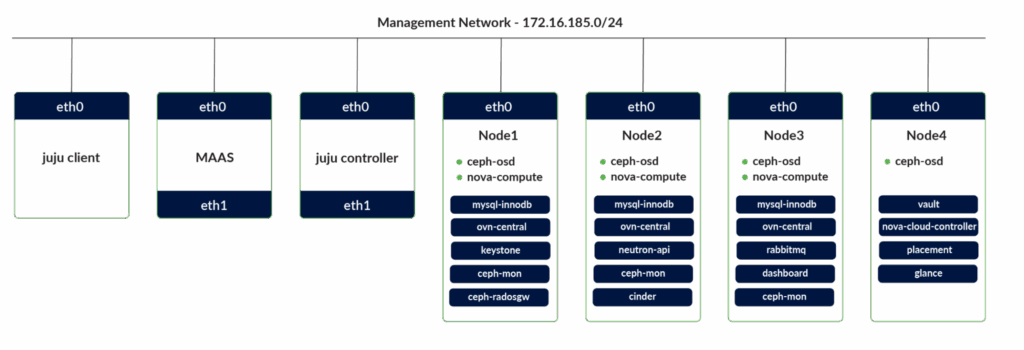
Deployment architecture
The deployment architecture of Charmed OpenStack includes the following components.
- MAAS controller: This component manages physical servers, providing DHCP, DNS, and PXE booting to provision Ubuntu on bare-metal nodes.
- Juju controller: OpenStack services orchestration using prebuilt scripts. Juju can perform installations, configurations, scaling up, and upgrades of services.
- Controller and compute nodes: These include Nova compute for VM hosting and Neutron with OVN for virtual networking.
- Storage: Options include block storage Cinder via Ceph, object storage via RADOS Gateway, and image Glance storage.
Hardware and software requirements
Canonical OpenStack releases are synchronized with the release cycle of upstream OpenStack. Canonical provides support for the specific versions of OpenStack with Ubuntu releases. The latest stable version supported by OpenStack charms is 2023.2 (Bobcat) with Ubuntu 22.04 LTS OS. Canonical has a newer open-source project called Sunbeam, which provides a simplified deployment of OpenStack; the supported releases are 2024.1 onward. The detailed support matrix is available here.
In this article, we will use the following versions for deploying Charmed OpenStack.
- Operating system: Ubuntu 22.04 LTS (Jammy)
- Openstack release: 2023.2 (Bobcat)
- Ceph release: Reef/Stable
- MAAS : 3.6/Stable
- Juju: 3.6/Stable
The deployment will require the following minimal hardware nodes. For a non-production environment, this deployment can also be done on VMs whose power management can be configured via MAAS, e.g., LXD VMs or KVM libvirt.
Juju client x 1 | Laptop or any lightweight machine |
Juju Controller x 1 | 2 CPU, 4 GB RAM, 1 NIC, 1 x 40 GB storage |
MAAS x 1 | 2 CPU, 8 GB RAM, 1 NIC, 1 x 40 GB storage |
Cloud Nodes x 4 | 4 CPU, 8 GB RAM, 1 NIC, 2 x 80 GB storage |

Automated Red Hat OpenShift Data Protection & Intelligent Recovery
Perform secure application-centric backups of containers, VMs, helm & operators
Use pre-staged snapshots to instantly test, transform, and restore during recovery
Scale with fully automated policy-driven backup-and-restore workflows
Comparison of Canonical OpenStack and Kolla-Ansible
The OpenStack cloud can be deployed via various methods, including manually via source code or using distribution packages. In addition to Charmed OpenStack, various automated deployment tools exist. Here, we will compare Charmed OpenStack with a related tool, Kolla Ansible, which utilizes Ansible for service orchestration.
Feature | Charmed OpenStack | Kolla Ansible |
Deployment model | System containers | Application containers |
Configuration Tool | Juju | Ansible |
Container Runtime | LXC | Docker or podman |
Complexity | Medium | Low |
Supported OS | Ubuntu | Multiple: Ubuntu, CentOS, Rocky Linux |
High Availability | HA builtin | HA builtin |
Upgrades | Rolling upgrades with minimum downtime | Rolling upgrades with minimum downtime |
Customization | Higher flexibility | Less flexibility |
Kolla Ansible is a typical choice for those who look for a fast, lightweight deployment, have prior experience with containerized applications, and want to take advantage of rolling upgrades. Alternatively, if you have an Ubuntu-centric environment, would like to perform bare-metal deployment and utilize system containers for isolation, and optionally opt for commercial support, you can choose Charmed OpenStack.
Deployment workflow
In the following workflow, we will deploy a minimal cloud with multiple services hosted on and shared among cloud nodes. We will implement high availability for applications that support native HA, like RabbitMQ, MySQL, Ceph, and OVN. The deployment can be easily scaled up via Juju orchestration.
Deployment information
Before starting the deployment, we need to capture the following hardware and network information. We will be using a private IPv4 subnet for the deployment and will require a proxy and external DNS to connect to the internet and download the required packages.
Subnet | 172.16.185.0/24 |
Gateway | 172.16.185.1 |
MAAS | 172.16.185.10 |
DHCP | Provided by MAAS |
DNS | MAAS uses external DNS as forwarders (8.8.8.8, 1.1.1.1) |
Proxy | http://proxy.domain.com:3128 |
Ceph OSD Devices (Node1-Node4) | /dev/sdb (on nodes1-node4) |
OVN Bridge Interface (Node1-Node4) | eth0 (nodes1-node4) |
MAAS installation and configuration
As a first step, we need to deploy MAAS, which will provide DHCP, DNS, and PXE boot services for the cloud nodes. Log in to the MAAS node (172.16.185.10) and set up an external network proxy. Note that you can skip the proxy configurations below if you have live IP addresses available for your deployment.
$ sudo snap set system proxy.https="http://proxy.domain.com:3128"
Install the test database for the small-scale deployment below.
$ sudo snap install maas-test-db
Install MAAS from the 3.6 stable channel.
$ sudo snap install maas --channel=3.6/stable
Initialize the MAAS region and rack services, and connect with the database installed above.
					$ sudo maas init region+rack \
--maas-url http://172.16.185.10:5240/MAAS \
--database-uri maas-test-db:///
Retrieve the API key for the admin user, which will be used in subsequent steps.
$ sudo maas apikey --username admin > ~ubuntu/admin-api-key
Log into the MAAS dashboard and complete the onboarding process. You will need to select the Ubuntu 22.04 image (amd64) for image sync; MAAS will use this image for cloud node deployment. You also need to enable DHCP for the network subnet/VLAN on which the cloud nodes will be deployed. Verify that all of the following services on the MAAS controller are green.

MAAS services status
Commissioning nodes
We need to onboard the Juju controller and the cloud nodes onto MAAS. All the machines must have one of the MAAS-supported power management solutions. After onboarding, select all the machines and Commision the nodes from the Actions menu. Wait for all the machines to be in the Ready state.
Next, we will tag the machines that will be used by Juju to install the Juju controller and OpenStack services. We will assign the tag “juju” to the Juju controller and “compute” to the cloud nodes. Select each machine on MAAS and assign the tag from the Configuration tab.
Create an Open vSwitch bridge
We need to create an OVN bridge interface on the cloud nodes. After the nodes have reached a Ready state, select each cloud node and, under the Network tab of the machine configuration, select the network interface. Then, click Create Bridge. Provide the bridge name br-ex and bridge type Open vSwitch (ovs); IP assignment to be automatic. Identical bridge names on all nodes will simplify the Newtron networking configuration.

Cloud node network configuration
Juju installation
We will use a lightweight Ubuntu machine as the Juju client. Install it as follows:
$ sudo snap install juju --channel=3.6/stable
We will connect the MAAS controller with the Juju client. Create a maas-cloud.yaml configuration file with the MAAS endpoint.
					## maas-cloud.yaml ##
clouds:
  maas-one:
    type: maas
    auth-types: [oauth1]
    endpoint: http://172.16.185.10:5240/MAAS
Add the MAAS cloud definition to Juju.
$ juju add-cloud --client -f maas-cloud.yaml maas-one
Next, we need to define the credentials to connect with MAAS. Create a maas-creds.yaml file. For the maas-oath token, use the admin API key retrieved above.
					## maas-creds.yaml ##
credentials:
  maas-one:
    anyuser:
      auth-type: oauth1
      maas-oauth: tppVSY6wk04jSluCVa:HcGFUOA7L5Y9O4f5............
Add the MAAS credentials to the juju client.
$ juju add-credential --client -f maas-creds.yaml maas-one
Create a configuration file with proxy environment variables.
					## config.yaml ##
no-proxy: localhost,127.0.0.1,172.16.0.0/12
apt-http-proxy: http://101.50.84.250:3128
apt-https-proxy: http://101.50.84.250:3128
juju-http-proxy: http://101.50.84.250:3128
juju-https-proxy: http://101.50.84.250:3128
snap-http-proxy: http://101.50.84.250:3128
snap-https-proxy: http://101.50.84.250:3128
Download the juju controller charm.
$ juju download juju-controller --channel 3.6/stable --base ubuntu@22.04 > juju-controller.charm
Bootstrap the Juju controller with the downloaded charm. This will prepare the Juju controller on the machine tagged with juju.
					$ juju bootstrap --config=config.yaml --bootstrap-base=ubuntu@22.04 \
--controller-charm-path=./juju-controller_r116.charm \
--constraints tags=juju maas-one maas-controller
Add the OpenStack model to the Juju controller.
$ juju add-model --config default-series=jammy openstack
Now we are ready to perform the OpenStack installation.
OpenStack installation
The installation and interconnection of OpenStack services will be done via Juju CLI. The commands will be run on the Juju client machine, and required installations and configurations will be processed by the Juju controller.
When you run the juju CLI commands, you can check the status of the deployed model via “juju status.” The juju orchestration performs the downloading of required packages and takes care of the required node installations, configuration, and interconnectivity of the components. The deployment will take a few hours, depending on the speed of the Internet connection and the resources of the nodes. You can open a separate terminal on the Juju client machine and run the following command, which will keep updating the status of the OpenStack model and different applications and nodes every 10 seconds.
$ watch -n 10 -c juju status --color
We have to deploy multiple components and services as part of the OpenStack deployment and will be distributing these across available nodes to balance the utilization.
OpenStack Services Distribution
Ceph OSD deployment
We will deploy the Ceph object storage daemon (OSD) on the four cloud nodes. We will use the available storage disk on each of the nodes (/dev/sdb) as the OSD devices.
Create the following ceph-osd.yaml configuration file.
					## ceph-osd.yaml ##
ceph-osd:
  osd-devices: /dev/sdb
Deploy four units of the Ceph OSD targeting the four cloud nodes with the tag compute.
					$ juju deploy -n 4 --channel reef/stable \
--config ceph-osd.yaml --constraints tags=compute ceph-osd
After the deployment, the Juju status will have four units of Ceph-OSD on the four cloud nodes (node1, node2, node3, node4), with the corresponding machine IDs of 0, 1, 2, and 3 in the Juju model. We will use these machine IDs to target the installation of different services.

Juju OpenStack model nodes
Nova Compute
Create a deployment configuration file, nova-compute.yaml, for Nova Compute.
					## nova-compute.yaml ##
nova-compute:
  config-flags: default_ephemeral_format=ext4
  enable-live-migration: true
  enable-resize: true
  migration-auth-type: ssh
  virt-type: qemu
Deploy three units of Nova Compute Service on machine IDs 1, 2, and 3.
					$ juju deploy -n 3 --to 1,2,3 --channel 2023.2/stable \
--config nova-compute.yaml nova-compute
The juju status will be as follows after the deployment. The missing relations will be created in the following steps after the deployment of the required units.
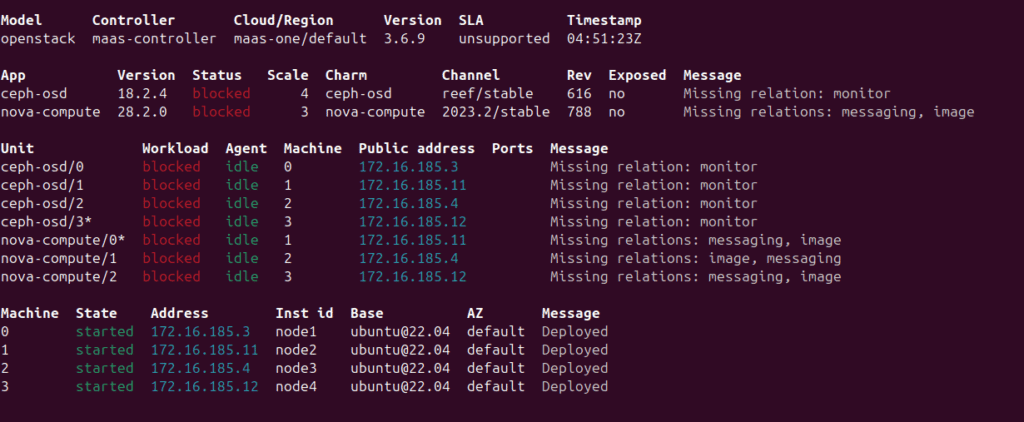
Juju status output
MySQL InnoDB cluster
MySQL will be deployed as a cluster of three nodes. The installation of each MySQL instance will be on an LXD container created and deployed on node1, node2, and node3.
					$ juju deploy -n 3 --to lxd:0,lxd:1,lxd:2 \
--channel 8.0/stable mysql-innodb-cluster
Hashicorp Vault
Hashicorp Vault is used for secure handling and storage of secrets. Deploy a vault unit on an LXD container on node4.
$ juju deploy --to lxd:3 --channel 1.8/stable vault
We need to initialize and unseal the vault before moving forward. This will be done outside the Juju model configuration. Install the vault to be used as a client on the Juju client machine.
$ sudo snap install vault
Identify the IP address of the deployed vault using the “juju status vault” command.

Juju vault status
Define the environment variable for the vault address and initialize the vault, which generates the unseal keys and the root token.
					$ export VAULT_ADDR="http://172.16.185.16:8200"
$ vault operator init -key-shares=5 -key-threshold=3
Unseal the vault using three of the generated keys.
					$ vault operator unseal kH3KXf3GtOkxv1812TUUkljHM4Ij7COeVUXYo
$ vault operator unseal foJ6SECj6rAF3nsS3BBcM9cdc+pWxsp16QEd7
$ vault operator unseal HuwhpEOwgs7quG/KJqeVokDUidPuYGhPNcSxe
The vault charm needs to be authorized on the deployed vault so that it is able to create secrets and define roles for the applications to access to the vault. Using the initial root token generated with the vault initialization, create a temporary root token with a lifetime of 10 minutes and authorize the vault charm.
					$ export VAULT_TOKEN=s.4ruBWJfFRr1UJM1N
$ vault token create -ttl=10m
Key                  Value
---                  -----
token                s.gepQmaPYaBORbLwghxT1
token_accessor       lvrDjggf1h1rIi0jPxmeRQmT
token_duration       10m
token_renewable      true
token_policies       ["root"]
identity_policies    []
policies             ["root"]

$ juju run vault/leader authorize-charm token=s.gepQmaPYaBORbLwghxT1
Create a self-signed certificate authority on the vault.
$ juju run vault/leader generate-root-ca
We need to connect the vault with the MySQL cluster using mysql-router. Create a MySQL router instance for the vault and connect it with the MySQL cluster and with the vault.
					$ juju deploy --channel 8.0/stable mysql-router vault-mysql-router
$ juju integrate vault-mysql-router:db-router mysql-innodb-cluster:db-router
$ juju integrate vault-mysql-router:shared-db vault:shared-db
To secure MySQL connections via TLS, create a relation between the MySQL cluster and the vault charm, which manages certificates.
$ juju integrate mysql-innodb-cluster:certificates vault:certificates
Neutron networking
To provide a networking service for the machines deployed on OpenStack, we need to deploy the Neutron API endpoint and the control plane services for the OVN. Create a neutron.yaml file to define OVS bridge mapping (br-ex) to the physical interface on the nodes.
					## neutron.yaml ##
ovn-chassis:
  bridge-interface-mappings: br-ex:eth0
  ovn-bridge-mappings: physnet1:br-ex
neutron-api:
  neutron-security-groups: true
  flat-network-providers: physnet1
The OVN control plane services with the name ovn-central will be deployed on node1, node2, and node3 in LXD containers.
					$ juju deploy -n 3 --to lxd:0,lxd:1,lxd:2 \
--channel 23.09/stable ovn-central
The neutron-api application will be deployed on node1 with the neutron.yaml configuration file above.
					$ juju deploy --to lxd:1 --channel 2023.2/stable \
--config neutron.yaml neutron-api
Deploy the charm application neutron-api-plugin-ovn to integrate Neutron API with OVN. Deploy the ovn-chassis charm to compute node1, node2, and node3, configuring OVN’s data plane to handle VM networking. The neutron.yaml settings ensure provider network connectivity via physnet1, mapped to br-ex and eth0.
					$ juju deploy --channel 2023.2/stable neutron-api-plugin-ovn
$ juju deploy --channel 23.09/stable \
--config neutron.yaml ovn-chassis
The following commands will establish the necessary relationships among the neutron-api, neutron-api-plugin-ovn, ovn-central, ovn-chassis, nova-compute, and vault applications.
					$ juju integrate neutron-api-plugin-ovn:neutron-plugin neutron-api:neutron-plugin-api-subordinate
$ juju integrate neutron-api-plugin-ovn:ovsdb-cms ovn-central:ovsdb-cms
$ juju integrate ovn-chassis:ovsdb ovn-central:ovsdb
$ juju integrate ovn-chassis:nova-compute nova-compute:neutron-plugin
$ juju integrate neutron-api:certificates vault:certificates
$ juju integrate neutron-api-plugin-ovn:certificates vault:certificates
$ juju integrate ovn-central:certificates vault:certificates
$ juju integrate ovn-chassis:certificates vault:certificates
We now need to connect the Neutron API with the MySQL cluster using mysql-router. Create a MySQL router instance for the neutron-api and connect it with the MySQL cluster and with the API.
					$ juju deploy --channel 8.0/stable mysql-router neutron-api-mysql-router
$ juju integrate neutron-api-mysql-router:db-router mysql-innodb-cluster:db-router
$ juju integrate neutron-api-mysql-router:shared-db neutron-api:shared-db
Keystone
The keystone application will be deployed on node1 within an LXD container.
$ juju deploy --to lxd:0 --channel 2023.2/stable keystone
We will connect the Keystone to the MySQL cluster using the router.
					$ juju deploy --channel 8.0/stable mysql-router keystone-mysql-router
$ juju integrate keystone-mysql-router:db-router mysql-innodb-cluster:db-router
$ juju integrate keystone-mysql-router:shared-db keystone:shared-db
Integrate Keystone with the vault so that it is able to retrieve TLS certificates from the secrets engine.
$ juju integrate keystone:certificates vault:certificates
The following commands will integrate Neutron API with Keystone for authentication and authorization of API requests.
$ juju integrate keystone:identity-service neutron-api:identity-service
RabbitMQ
The RabbitMQ application will be deployed on node 3 within an LXD container.
$ juju deploy --to lxd:2 --channel 3.9/stable rabbitmq-server
We will create relations to integrate Neutron API and Nova Compute with the RabbitMQ messaging service.
					$ juju integrate rabbitmq-server:amqp neutron-api:amqp
$ juju integrate rabbitmq-server:amqp nova-compute:amqp
Nova cloud controller
The Nova cloud controller application includes the nova-scheduler, nova-api, and nova-conductor services.
Create a configuration file ncc.yaml for the controller.
					nova-cloud-controller:
  network-manager: Neutron
Deploy the Nova cloud controller on node4 within an LXD container.
					$ juju deploy --to lxd:3 --channel 2023.2/stable \
--config ncc.yaml nova-cloud-controller
We will connect the Nova cloud controller to the MYSQL cluster using the router.
					$ juju deploy --channel 8.0/stable mysql-router ncc-mysql-router
$ juju integrate ncc-mysql-router:db-router mysql-innodb-cluster:db-router
$ juju integrate ncc-mysql-router:shared-db nova-cloud-controller:shared-db
The following relations need to be created among the nova-cloud-controller, keystone, rabbitmq-server, neutron-api, nova-compute, and vault applications.
					$ juju integrate nova-cloud-controller:identity-service keystone:identity-service
$ juju integrate nova-cloud-controller:amqp rabbitmq-server:amqp
$ juju integrate nova-cloud-controller:neutron-api neutron-api:neutron-api
$ juju integrate nova-cloud-controller:cloud-compute nova-compute:cloud-compute
$ juju integrate nova-cloud-controller:certificates vault:certificates
Placement
Deploy the placement application on node4 within an LXD container.
$ juju deploy --to lxd:3 --channel 2023.2/stable placement
Connect the placement application to the MySQL cluster using the router.
					$ juju deploy --channel 8.0/stable mysql-router placement-mysql-router
$ juju integrate placement-mysql-router:db-router mysql-innodb-cluster:db-router
$ juju integrate placement-mysql-router:shared-db placement:shared-db
Create relations between the Placement and Keystone, Nova Cloud Controller, and Vault.
					$ juju integrate placement:identity-service keystone:identity-service
$ juju integrate placement:placement nova-cloud-controller:placement
$ juju integrate placement:certificates vault:certificates
OpenStack dashboard
We will deploy the OpenStack Dashboard application (Horizon) on node3 within an LXD container.
$ juju deploy --to lxd:2 --channel 2023.2/stable openstack-dashboard
Join openstack-dashboard to the MYSQL cluster using the router charm for dashboard:
					$ juju deploy --channel 8.0/stable mysql-router dashboard-mysql-router
$ juju integrate dashboard-mysql-router:db-router mysql-innodb-cluster:db-router
$ juju integrate dashboard-mysql-router:shared-db openstack-dashboard:shared-db
Enable the dashboard to use Keystone for authentication. For HTTPS access, enable the dashboard to access the vault for TLS certificates.
					$ juju integrate openstack-dashboard:identity-service keystone:identity-service
$ juju integrate openstack-dashboard:certificates vault:certificates
Glance
Deploy the Glance application on node4 within an LXD container.
$ juju deploy --to lxd:3 --channel 2023.2/stable glance
Join Glance to the MYSQL cluster.
					$ juju deploy --channel 8.0/stable mysql-router glance-mysql-router
$ juju integrate glance-mysql-router:db-router mysql-innodb-cluster:db-router
$ juju integrate glance-mysql-router:shared-db glance:shared-db
Integrate Glance with Nova Cloud Controller, Nova Compute, Keystone, and Vault.
					$ juju integrate glance:image-service nova-cloud-controller:image-service
$ juju integrate glance:image-service nova-compute:image-service
$ juju integrate glance:identity-service keystone:identity-service
$ juju integrate glance:certificates vault:certificates
Ceph monitor
We will deploy three units of the Ceph monitor application on node1, node2, and node3 within LXD containers. Create a ceph-mon.yaml file with the configuration that the Ceph monitor cluster will have three nodes with at least four disks (OSDs).
					## ceph-mon.yaml ##
ceph-mon:
  expected-osd-count: 4
  monitor-count: 3
Deploy the Ceph monitor nodes using the above configuration.
$ juju deploy -n 3 --to lxd:0,lxd:1,lxd:2 --channel reef/stable --config ceph-mon.yaml ceph-mon
Integrate Ceph monitor with Ceph OSD, Nova Compute, and Glance service.
					$ juju integrate ceph-mon:osd ceph-osd:mon
$ juju integrate ceph-mon:client nova-compute:ceph
$ juju integrate ceph-mon:client glance:ceph
Cinder
Create a configuration file for Cinder, cinder.yaml, as follows.
					## cinder.yaml ##
cinder:
  block-device: None
  glance-api-version: 2
Deploy the Cinder application on node2 within an LXD container.
					$ juju deploy --to lxd:1 --channel 2023.2/stable \
--config cinder.yaml cinder
Join Cinder to the MySQL cluster.
					$ juju deploy --channel 8.0/stable mysql-router cinder-mysql-router
$ juju integrate cinder-mysql-router:db-router mysql-innodb-cluster:db-router
$ juju integrate cinder-mysql-router:shared-db cinder:shared-db
The Cinder application can now be integrated with Nova Cloud Controller, Keystone, RabbitMQ, Glance, and Vault.
					$ juju integrate cinder:cinder-volume-service nova-cloud-controller:cinder-volume-service
$ juju integrate cinder:identity-service keystone:identity-service
$ juju integrate cinder:amqp rabbitmq-server:amqp
$ juju integrate cinder:image-service glance:image-service
$ juju integrate cinder:certificates vault:certificates
We will use Ceph as the storage backend for Glance. Deploy the required charm cinder-ceph.
$ juju deploy --channel 2023.2/stable cinder-ceph
Integrate the cinder-ceph charm with Cinder, Ceph monitor, and Nova compute.
					$ juju integrate cinder-ceph:storage-backend cinder:storage-backend
$ juju integrate cinder-ceph:ceph ceph-mon:client
$ juju integrate cinder-ceph:ceph-access nova-compute:ceph-access
Ceph RADOS gateway
Deploy the Ceph RADOS gateway on node1 within an LXD container. This provides an S3- and Swift-compatible HTTP gateway.
$ juju deploy --to lxd:0 --channel reef/stable ceph-radosgw
Integrate the RADOS gateway with the Ceph monitor.
$ juju integrate ceph-radosgw:mon ceph-mon:radosgw
Deployment status
After we have completed all the above steps, the charms will be deployed and the required relations will have been established, and we will have the OpenStack cloud ready for use. We should see the following juju status output after a successful deployment without any error messages.
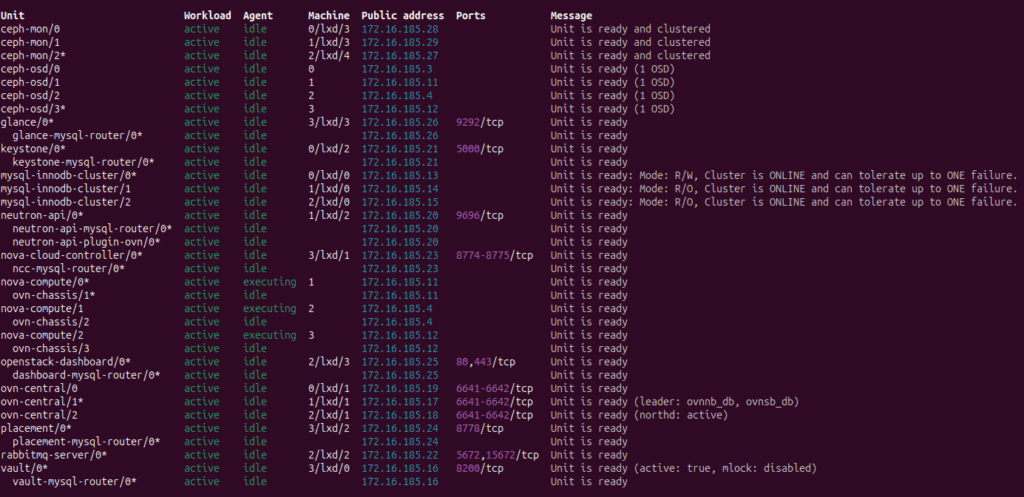
Juju successful deployment status
We can now start using the deployed OpenStack cloud. We can check the status of the dashboard service and filter the unit IP address of the Dashboard service as follows.
					$ juju status --format=yaml openstack-dashboard | \
grep public-address | awk '{print $2}' | head -1
172.16.185.25
The password for the admin user created during deployment can be accessed from Keystone.
					$ juju exec --unit keystone/leader leader-get admin_passwd
add9Uad3eiwie1qz
The dashboard is now accessible using URL http://172.16.185.25/horizon with user name admin, password add9Uad3eiwie1qz, and domain admin_domain.
Learn How To Best Backup & Restore Virtual Machines Running on OpenShift
Last thoughts
The model-based deployment via Juju charms offers a structured and automated approach to managing complex OpenStack cloud infrastructure. Charms encapsulate the best practices for consistent and stable deployment across multiple environments. MAAS integration with Juju provides automated OS installation and configurations on both physical nodes and containers.

Like This Article?
Subscribe to our LinkedIn Newsletter to receive more educational content